 |
|---|
| Vivo U20 |
| BUY NOW |
OVERVIEW: VIVO U20
Couple of months back Vivo had announced this new series with Vivo U10. Now Vivo U20 has been announced with upgraded hardware. In fact, the Vivo U20 is a successor of the Vivo U10. Those are two different categories, two different devices with different hardware as well.
The device comes with an IPS LCD FHD+ display measuring 6.53 inches with a resolution of 1080×2340 pixels. It packs with Qualcomm Snapdragon 675 chipset with Adreno 612 GPU. The device has onboard storage of 64GB which can be extended up to 256 GB via a MicroSD slot. It comes with 4GB/6GB RAM. There’s a massive 5,000mAh battery available that supports 18W fast charging.
Vivo U20 has a triple rear camera setup of 16MP (wide, f/1.8) + 8MP (ultrawide, f/2.2) + 2MP (macro camera, f/2.4) sensor. While the front packs a 16MP (wide, f/2.0) selfie shooter.
WHAT DO YOU MEAN BY ROOTING VIVO U20?
Rooting Vivo U20 from outside does not affect anything. Rooting will only install an additional app on your Vivo U20 which is the root manager app that enables root applications to run.
The only way to completely control your Vivo U20 is by rooting. Before I continue, I ‘d like to note that rooting your Vivo U20 is not an easy process and you may have some minor issues along the way. And follow our step-by – step guide carefully if you want to avoid all the problems. After the rooting you will become the super administrator of your Vivo U20.
ADVANTAGES OF ROOTING VIVO U20
- Can extend the battery life of Vivo U20.
- You can flash custom ROMs on the Vivo U20.
- On Vivo U20 you’ll be able to run special applications.
- You can uninstall apps that have been pre-installed on Vivo U20.
- Can improve Vivo U20’s performance on CPU and GPU.
DISADVANTAGES OF ROOTING VIVO U20
- Risk of “bricking” your Vivo U20.
- You won’t be able to use Banking Apps like Paypal, Payoneer.
- Your warranty will be void after rooting Vivo U20.
PRE-REQUISITE:
1. Your Vivo U20 battery should be minimum 60%.
2. I ‘d highly recommend that you backup your entire device. Yes, you can keep your Vivo U20 data on your laptop.
3. Download all the required files from below.
DOWNLOADS:
1. Download – ADB & Fastboot
2. Download – Vivo USB Drivers
3. Download – Vivo U20 Stock Rom
4. Download – QFil Flash Tool
5. Download – Magisk Manager
WARNING:
It is advised to follow the steps mentioned in this post very carefully to avoid permanent damage or to brick your device. If anything goes wrong TheWorldsBestAndWorst is not responsible for it.
LET’S ROOT VIVO U20
Once you have downloaded all the files, you can go ahead and root your Vivo U20:
1. EXTRACT AND PATCH “BOOT.IMG” USING MAGISK
- Download Stock Rom from above link and extract it to your PC.
- After extracting Stock Rom, find boot.img file and paste that into your device storage.
- Install and open magisk manager
- After launching magisk manager, GO TO – Install > Install > Patch Boot Image File. (Now select the boot.img file which you have copied.)
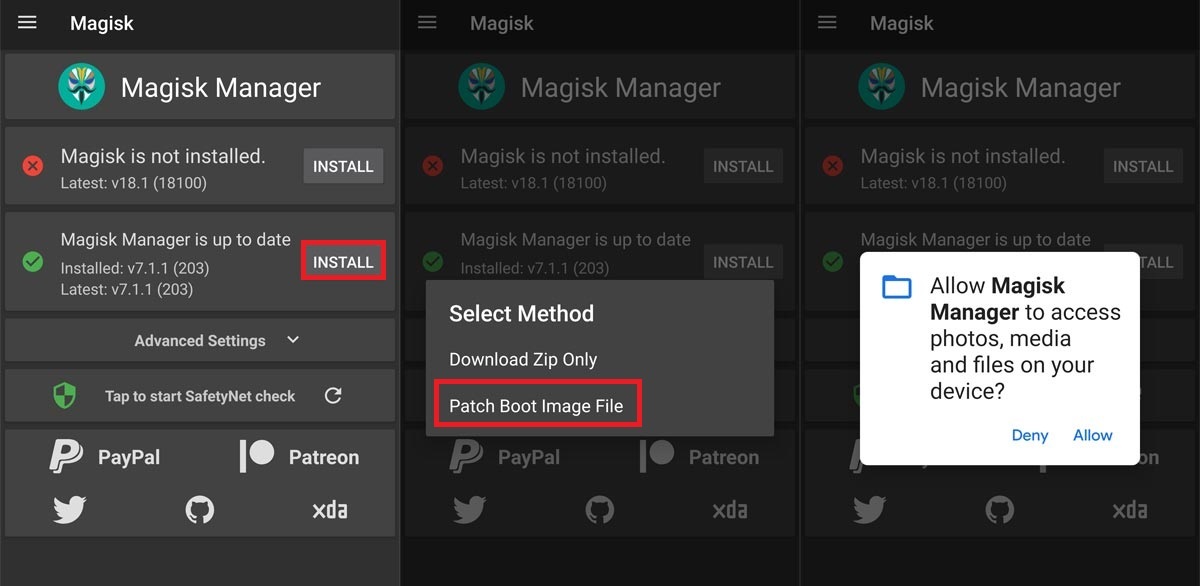
- Magisk manager will start patching boot.img, wait for couple of seconds.
- Once boot.img is patched, it will be in your internal device storage named as “patched_boot.img”
2. STEPS TO INSTALL “PATCHED_BOOT.IMG” IN YOUR DEVICE
- Now you have to install QPST and run QFIL. Select Flat build, then navigate the programmer path to your ROM folder. Select the prog_emmc_ufs_firehose_Sdm660_ddr.elf as your programmer path. Next, load XMLs RawProgram0.xml and patch0.xml.
- Boot your Vivo U20 in download mode. To do that press and hold Shift Key and Right Click button on the mouse in the empty space. You will see the below dialog box popping up.
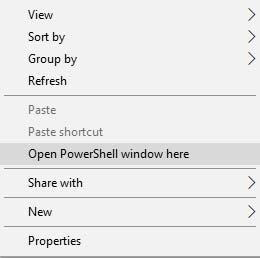
- Hit Open Powershell Window or Command window here.
- Now boot into Download Mode by typing ADB command.
- QFIL should go from ‘No Port’ to ‘Qualcomm HS-USB QDLoader 9008’.
- Now hit the “Download” button, this step will reset your Vivo U20.
- If flashing was successful, wait a bit then boot your device.
- You will see a little warning complaining that the software has been changed.
- Now, you can install magisk manager at this point if it didn’t show up after the flash.
- Reboot the device again.
- Congratulations! You should have a rooted Vivo U20.
HOW TO CHECK IF YOUR VIVO U20 IS ROOTED OR NOT?
Download Root Checker App in your Vivo U20. Then open the application and click “Verify Root”. After that you get this message “Congratulations! Root Access properly installed on this device” if your device is rooted successfully.
We hope you’ve found this guide helpful. If you are facing any issues while rooting or you need a rooting guide of any other mobile then just leave a comment, we will be happy to help you.