 |
|---|
| Samsung Galaxy A31 |
| BUY NOW |
Samsung has now updated its Galaxy J series with the Galaxy A series. Galaxy A series has become a big lineup and contains a variety of smartphones. Samsung made a budget entry in the A-series with Samsung A31. The phone comes with an AMOLED display with premium design. This makes it the perfect choice for Netflix lovers. To make most of Samsung Galaxy A31, rooting the phone is really the best option. This article is a step-by-step guide for rooting Samsung Galaxy A31.
Rooting is done to increase the benefits of any Android device. To get more powerful features, you can use Magsik modules and Xposed Framework. You can downclock or overclock the CPU by rooting and to increase the battery and performance of the device. Also, you can change the UI to the next level by installing the Substratum theme.
MediaTek Helio P65 Chipset powers Samsung Galaxy A31. The phone comes with 4GB RAM and 64GB internal memory. 6.4 inches Super AMOLED panel display runs on 1080 x 2400 pixels resolution. 48+8+5+5 MP Camera setup on the rear side supports advanced features like Digital Zoom, Autoflash, Face detection, and Touch to focus. A 20 MP front camera is placed in a teardrop notch. The phone is powered by a 5000 mAh battery with 15W quick charging support.
WARNING:
Before proceeding to root your phone, you have to make sure that your phone is completely backed up to prepare for the worst-case scenario. Rooting will void your warranty, and the TheWorldsBestAndWorst will not be liable for any loss of data nor bricking your device.
DOWNLOAD SECTION:
1. Stock Firmware for Galaxy A31
2. USB Drivers
3. Odin Flash Tool
4. Magisk Manager
NOTE:
Please note that all the images given below are just for reference, the actual A31 UI may be different.
How to Root Samsung Galaxy A31 with Magisk
Step 1: Unlock the Bootloader
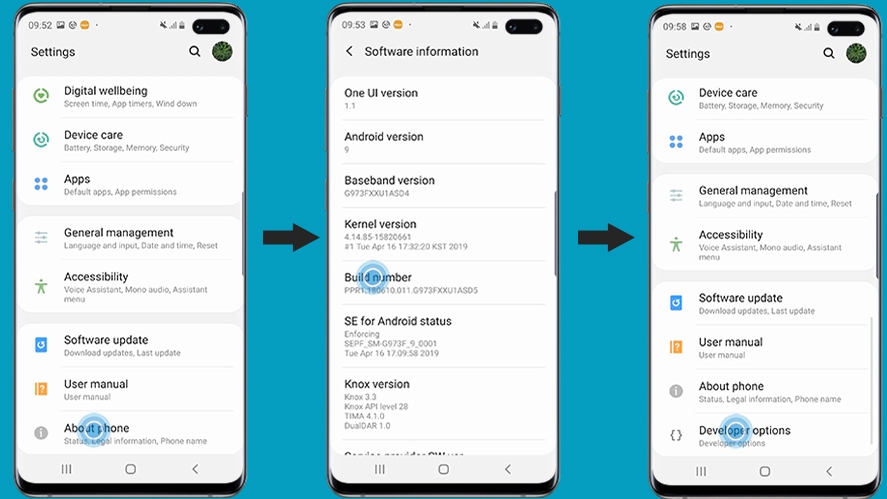
- Go to the Settings -> About Phone. Now continuously tap on “Build number” and then it will say “Developer Mode Has Been Turned On”
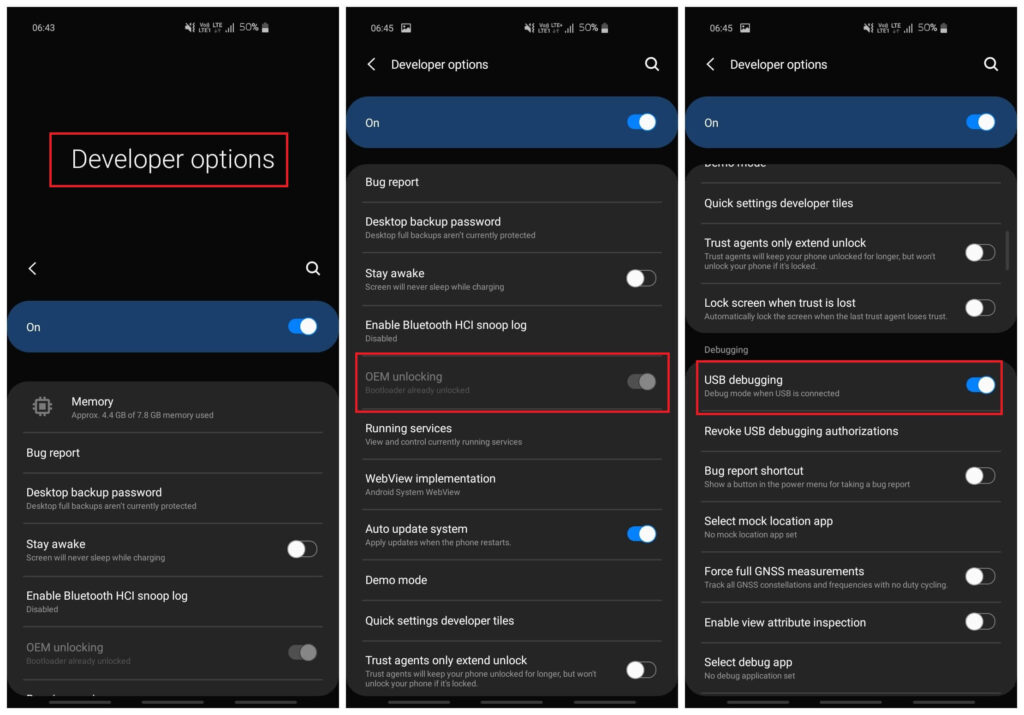
- You will be able to find the Developer Option in the Settings. Open it and Enable the “OEM Unlock” and “USB Debugging”
- Turn your device OFF and connect your device with PC via cable. Now hold Volume Down + Power Button. Release all the buttons when you notice the change in the screen and press Volume Up to boot into download mode.
- Press and hold volume up button to unlock bootloader. This will erase all the data in the phone, so make sure to backup your smartphone.
- Now your device will reboot.
Step 2: Extract AP_[device_model_sw_ver].tar.md5 from Firmware
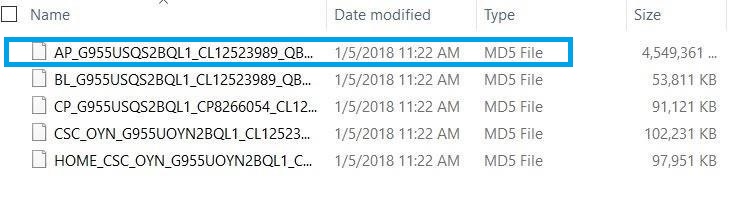
- Extract the firmware of A31 which you have downloaded and find the file with the name “AP_[device_model_sw_ver].tar.md5”. Now you have to transfer this file to Samsung galaxy A31.
Step 3: Patch the AP.tar.md5 file using Magisk Manager app
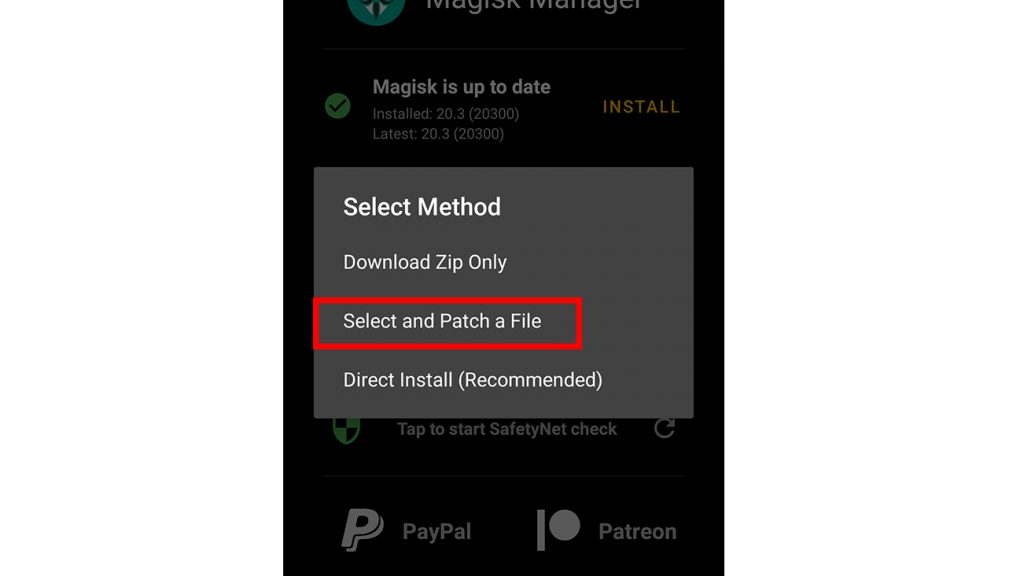
- I am thinking that you have downloaded the Magisk Manager and now you have to install it on your device.
- Open the application and tap on Install > Install > Select and Patch a File. Now select the “AP_[device_model_sw_ver].tar.md5” which you have transferred to your Galaxy A31.
- Magisk manager will start patching the file and the file will be saved as magisk_patched.tar.
- Now you have to convert magisk_patched.tar to magisk_patched.img using 7Zip.
Step 4: Flash the patched boot.img using Odin
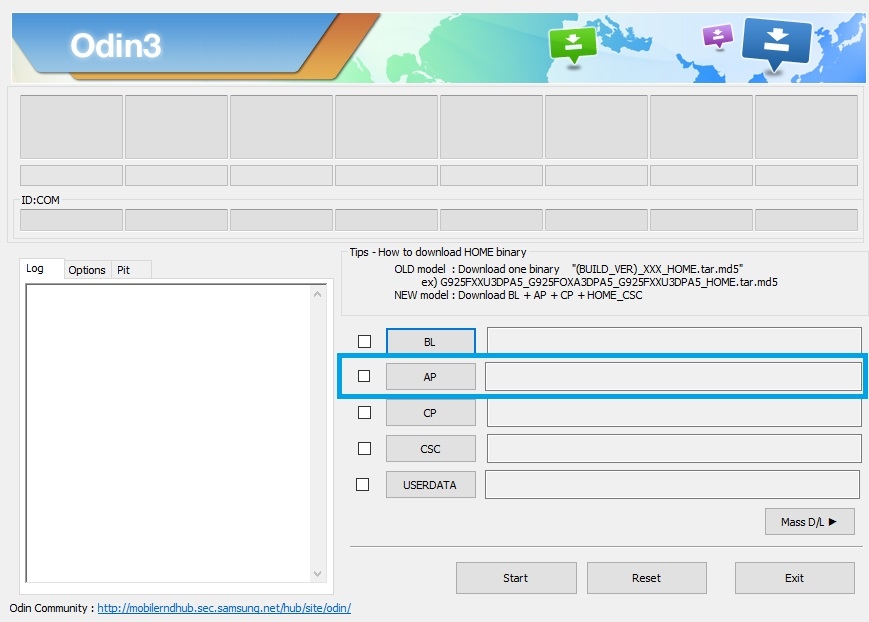
- Transfer magisk_patched.img to your PC and install the Odin Flash Tool which you have already downloaded.
- Boot into download mode, like you did earlier in Step 1.
- Now Open the Odin flash tool.
- Tap on “AP” and select “magisk_patched.img”
- Select the others BL, CP, and Home_CSC files from the Firmware
- Make sure that your “Auto Reboot” is unchecked in Options.
- Now hit on “Start” button and the flashing process will start.
Step 5: Full Wipe the System and Boot into System with Magisk
- Now as soon as the phone display turns off, press and hold the Power + Volume Up buttons at the same time. Now when you see your phone’s model on the screen just release all the buttons except the Volume Up. If you miss this step, then you have flash “magisk_patched.img” again.
- Now wipe all data by choosing Wipe data/factory reset.
- After you device is cleaned, simply click on Reboot.
You need to do this every single time you will reboot the device, Here are the Combinations you need to learn.
A. Powering up normally → System with no Magisk
B. (Power + Volume Up) → Bootloader warning → Release all buttons →System with Magisk
C. (Power + Volume Up) → Bootloader warning → Keep holding volume up → Actual recovery
CONGRATULATIONS! YOU HAVE ROOTED YOUR GALAXY A31.
We hope you’ve found this guide helpful. If you are facing any issues while rooting or you need a rooting guide of any other mobile then just leave a comment, we will be happy to help you.