As more people use the internet, the need for security has risen. There are more than 1,958,029,847 live websites on the internet. Security concerns are increasing with a massive amount of websites getting regularly published. If detection of an attack can take 197 days for discovery and 69 days for containment- “the threat is real.”
Fortunately, you can use an SSL certificate to secure your website from different cyberattacks. It enforces HTTPS protocol, ensuring communication between the web server and browser.
This is why it is essential to get a digital certificate from a leading certification authority and install it on your Microsoft Internet Information Services(IIS) system. Likewise, you can opt for a Comodo Positive SSL Wildcard certificate can quickly secure the main domain and its unlimited subdomains.
For example, if you have a primary domain(mydomain.com), you can secure multiple subdomains with a wildcard SSL certificate like [email protected], [email protected], and [email protected].
So, without further adieu, here is how you can install such a certificate for your Microsoft IIS 10.
4 Steps to Install a SSL Certificate In Microsoft IIS 10
Whether you are looking to install a Comodo Positive SSL Wildcard Certificate or any other digital certificate, the process begins by generating a certificate signing request.
Step 1: Generate CSR for installation of SSL certificate
First, search for Microsoft IIS on your PC. Then, open the IIS app on your PC and find the server name in the connections menu.
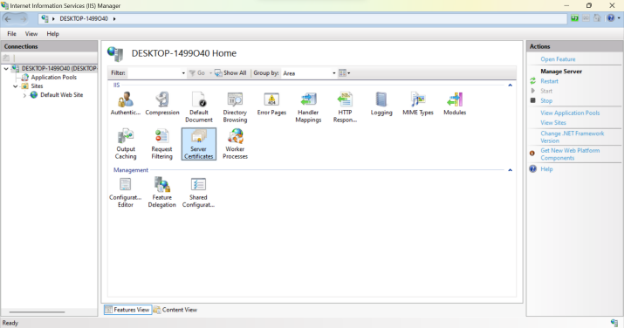
Now, click on the option “Server Certificates.”

Next, click on the “Create Certificate Request” option.
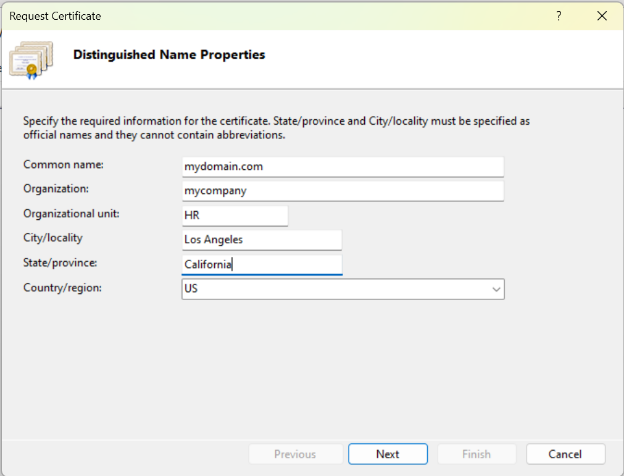
A new CSR wizard will open with different options that you need to fill with specific details like,
- A common name or fully-qualified domain name (FQDN) like your website’s URL name or any other term (in case of wildcard keep domain name as *.mydomain.com)
- Organization details include the company’s legally registered name, registration number, and more.
- Details of the organizational unit include your department’s name like HR, marketing, purchase, customer service, etc.
- Location details which include the legally registered location of the business unit
- State/Province information where your company is legally located or registered.
- Choose the correct option from the drop-down list to select the country where your company is legally located.

Further, you need to provide details in the cryptographic drop-down list like,
- Select the Microsoft RSA SChannel Cryptographic Provider or the one that will issue a digital certificate
- Specify bit length for the cryptographic encryption according to the provider or any specific value you need to opt for.

Specify the name of the file name for the certificate request and click on finish to complete the process. You will have a file saved on the PC with the completion of the process. Now that you have the CSR file ready, open it in a notepad and copy the file contents for further steps.
Step 2: Installing the SSL certificate on your web server
Installing the SSL certificate on your server begins with the CSR generation. Once the CSR is generated, certification authorities will issue a certificate and send the bundle file.

Download the SSL certificate .cer file from the bundle sent by CA. Further, open the Internet Information Services (IIS) Manager on your PC. now go to the server certificate option and click on the “Action Menu” on the right pane.
Step 3: Complete the certificate request

Click on the complete certificate request option to open a new wizard.

Further, you must fill in the wizard details for process completion.
- File name- Add the .cer file(your_domain_com.cer) from your computer or local storage on the wizard by clicking on the box.
- Friendly name- Give a name to the certificate, which will help in identification and is not directly associated with the digital certificate.
- Click on the drop-down option and select web hosting.
The installation process is complete once you select the web hosting and click on finish. Next, you need to assign the certificate.
Step 4: Assign your SSL certificate
To assign the SSL certificate to your website, go to the Connections pane in your IIS manager.

Now click on “Bindings,” and a new wizard will open.
Next, click on add and fill in the details below,
- Type: Select HTTPS from the drop-down list
- IP address: Select a specific IP address from the drop-down list or all unassigned addresses
- Port: Select 4463 port for SSL security purposes
- SSL certificate: Select your certificate installed from the drop-down list.

Once you add the details, click ok, and the binding process will be complete. Now your website is assigned with a Comodo Positive wildcard certificate.
Conclusion
Securing your website is no longer an option but a necessity, with 70% of breaches resulting from cyberattackers outside the system. Installing a wildcard SSL certificate will help you secure the main domain and its unlimited subdomains.