All the personal information about the user can be found in their Apple ID. It is the authentication that Apple uses for its devices such as iPhone, iPad, Mac laptops. You can use and operate all your apple devices or iOS operating system devices if you have an Apple ID. Just create an account, and with that Apple ID information, all your devices will get synced. You do not have to make multiple Apple ID accounts for all your devices. You can create your Apple ID without paying any money. It is free of charge.
All your Apple ID need is your email username which should be valid along with its password which should be alphanumeric and should have 8 characters in it. Then with a few verification steps, you will be able to open your personal Apple ID with a password of your choice. With so many passwords being used by us, we end up forgetting the passwords which are rarely used. So it might happen you decide to change your Apple ID for personal reasons, and you have forgotten the password to your Apple ID Account. You cannot access your account without giving the password.
So this article will thoroughly guide you on how to change your Apple ID on iPhone without requiring the password. Just follow the steps properly, and you will be able to log in to your Apple ID account easily, and you will not be asked to give the password for it.
Steps to Change Apple ID password on iPhone
Step 1: Go to Settings.
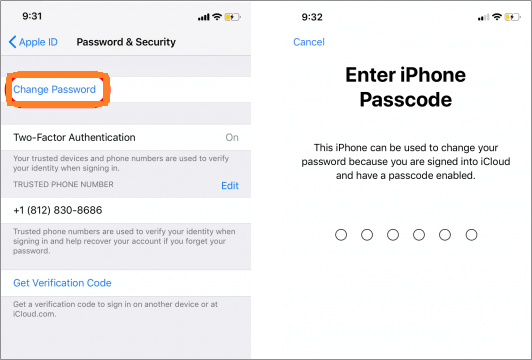
Step 2: Tap [your name] > Password & Security > Change Password.
Step 3: Enter your current device passcode.
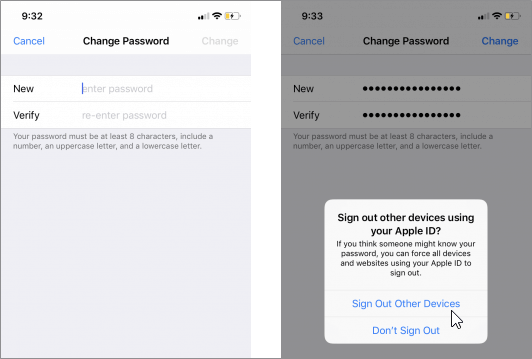
Step 4: Then enter a new password and confirm the new password.
Step 5: Tap Change > Sign Out Other Devices.
After you changed your password, you can go on to change your Apple ID on iPhone without data loss.
Steps to change Apple ID (an email address) on iPhone
Step 1: Go to Settings, click on [Your Name], then select Name, Phone Number, Email.
Step 2: Next to “CONTACTABLE AT“, click Edit and delete your current Apple ID.
Step 3: Click Continue. Enter the Apple ID you want to use. Click Next.
Step 4: You will now receive an email with a verification code.
Step 5: Verify and complete.
Steps to change your Apple ID (phone number) on iPhone
Step 1: Go to Settings > [your name] > “Name, Phone Number, Email“.
Step 2: Next to “CONTACTABLE AT“, click Edit > Delete.
Step 3: Click Continue and follow the instructions.
Step 4: After entering the mobile number to be used as the Apple ID, the verification code will be sent to you via this number.
Step 5: Enter the verification code in the text box.
Step 6: Log back into all Apple services with the new Apple ID.
Things to Do After Changing Apple ID
After changing Apple ID, it really important that you update your Apple ID setting.
If you are already signed-in to an Apple service using your Old Apple ID, simply log out of the service and sign in again using your new Apple ID and New Passcode.